Table of Contents
Introduction
Artificial Intelligence (AI) is no longer a futuristic concept—it’s here, and it’s transforming businesses worldwide. Microsoft Azure AI is a suite of cloud-based tools and services that empower organizations to build, deploy, and scale AI solutions quickly and cost-effectively. Whether you’re a small business or a large enterprise, Azure AI can help you automate processes, gain insights from data, and reduce operational costs.
In this chapter, we’ll explore:
- What Azure AI is and why it matters.
- Key Azure AI services and their benefits.
- A hands-on tutorial to deploy your first Azure AI solution using PowerShell.
What is Microsoft Azure AI?
Azure AI is a collection of AI services and tools hosted on Microsoft’s cloud platform, Azure. These services are designed to help businesses integrate AI capabilities into their applications without needing deep expertise in machine learning or data science. Azure AI includes:
- Azure Cognitive Services: Pre-built AI models for vision, speech, language, and decision-making.
- Azure Machine Learning: A platform for building, training, and deploying custom machine learning models.
- Azure Bot Services: Tools to create intelligent chatbots.
- Azure Applied AI Services: Industry-specific solutions like document processing and anomaly detection.
Why Azure AI?
- Cost Efficiency: Pay-as-you-go pricing ensures you only pay for what you use.
- Scalability: Easily scale AI solutions as your business grows.
- Ease of Use: Pre-built models and drag-and-drop tools make AI accessible to non-experts.
- Integration: Seamlessly integrate AI into existing applications and workflows.
Hands-On Tutorial: Deploying Your First Azure AI Solution
In this tutorial, we’ll use Azure Cognitive Services and PowerShell to create a sentiment analysis tool. This tool will analyze customer feedback and determine whether it’s positive, negative, or neutral helping you save time and improve customer satisfaction.
Step 1: Set Up an Azure Account
- Go to the Azure Portal.
- Sign up for a free account if you don’t have one. You’ll get $200 in credits to explore Azure services.
- Once logged in, navigate to the Azure Portal Dashboard.
Step 2: Create a Cognitive Services Resource
- In the Azure Portal, click Create a resource.
- Search for Azure AI Services and select it.
- Click Create and fill in the required details:
- Subscription: Choose your subscription.
- Resource Group: Create a new one (e.g., “ai-demo-yourname”).
- Region: Select a region closest to you.
- Pricing Tier: Choose “Free F0” for this tutorial.
- Name: Give your resource a unique name (e.g., “rg-SentimentAnalysis”).
- Click Review + create, then Create.
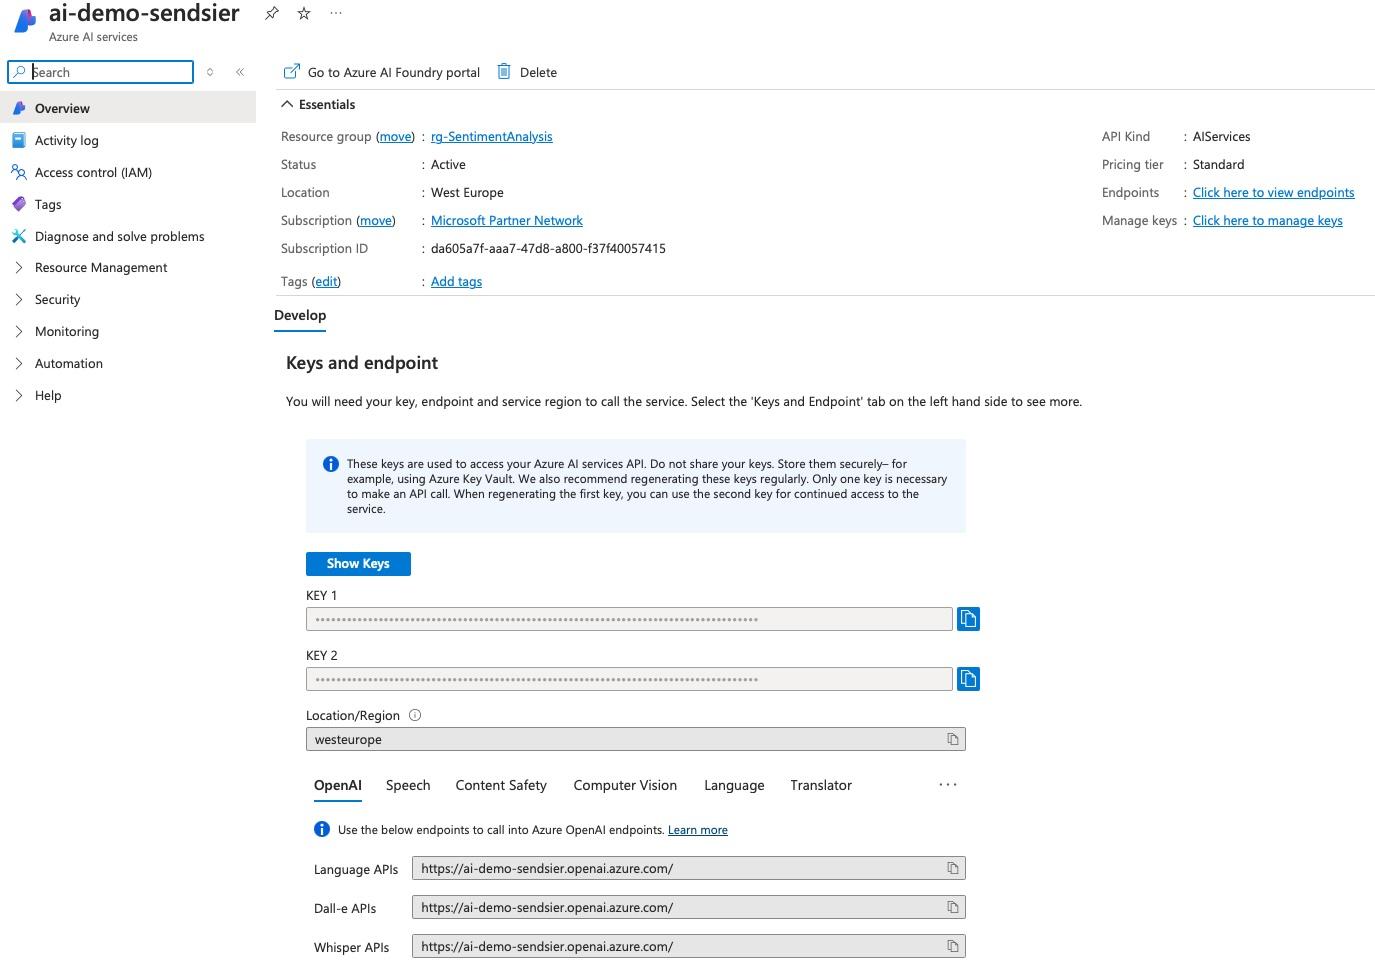
- Once the resource is deployed, go to the resource and note down the Endpoint and Key. You’ll need these to connect to the API.
Step 3: Write a PowerShell Script for Sentiment Analysis
1. Open PowerShell on your machine.
2. Install the Invoke-RestMethod module (if not already installed):
Install-Module -Name Invoke-RestMethod -Force2. Create a PowerShell script (sentiment_analysis.ps1) and paste the following code:
# Replace with your endpoint and key
$endpoint = "YOUR_ENDPOINT"
$key = "YOUR_KEY"

# Input text for analysis
$documents = @(
    @{ id = "1"; text = "I love Azure AI! It's making my business so much more efficient." },
    @{ id = "2"; text = "This product is terrible. I would never recommend it to anyone." },
    @{ id = "3"; text = "The service was okay, but it could be better." }
)

# Prepare the request body
$body = @{
    documents = $documents
} | ConvertTo-Json

# Call the Text Analytics API
$response = Invoke-RestMethod -Uri "$endpoint/text/analytics/v3.1/sentiment" `
                              -Method Post `
                              -Headers @{ "Ocp-Apim-Subscription-Key" = $key } `
                              -Body $body `
                              -ContentType "application/json"

# Display the results
$response.documents | ForEach-Object {
    Write-Host "Document ID: $($_.id)"
    Write-Host "Sentiment: $($_.sentiment)"
    Write-Host "Confidence Scores:"
    Write-Host "  Positive: $($_.confidenceScores.positive)"
    Write-Host "  Neutral: $($_.confidenceScores.neutral)"
    Write-Host "  Negative: $($_.confidenceScores.negative)"
    Write-Host ""
}
3. Replace YOUR_ENDPOINT and YOUR_KEY with the values from your Azure resource.
Step 4: Run the PowerShell Script
1. Save the script (sentiment_analysis.ps1).
2. Run the script in PowerShell:
.\sentiment_analysis.ps1Step 5: Interpret the results
The script will output the sentiment of each input text along with confidence scores. For example:
Document ID: 1
Sentiment: positive
Confidence Scores:
  Positive: 1
  Neutral: 0
  Negative: 0

Document ID: 2
Sentiment: negative
Confidence Scores:
  Positive: 0
  Neutral: 0
  Negative: 1

Document ID: 3
Sentiment: neutral
Confidence Scores:
  Positive: 0
  Neutral: 0.96
  Negative: 0.04
Diagram: How Azure Cognitive Services Work
Below is a simple diagram to illustrate the flow of the sentiment analysis process:
[Customer Feedback]
        ↓
[Azure Cognitive Services]
        ↓
[Text Analytics API] → Sentiment Analysis
        ↓
[Business Insights] → Improve Customer Experience
Conclusion
In this chapter, you learned what Azure AI is, why it’s valuable for businesses, and how to deploy your first AI solution using Azure Cognitive Services and PowerShell. By automating sentiment analysis, you can save time, reduce costs, and gain actionable insights into customer feedback.
In the next chapter, we’ll dive deeper into Azure Machine Learning and explore how predictive analytics can optimize your business operations.