Table of Contents
Introduction
This guide will help you with setting up a Windows 365 CloudPC for a world-wide enterprise environment
Synopsis
- Users are located globally, provide users with the “nearest” Win365 CloudPC possible
- No VPN required, the CloudPC is always connected to the WAN
- Possibility for different Windows365 SKU’s based on their persona (office user / heavy user / etc)
- Implement and integrate in existing Intune managed Modern Workplace setup
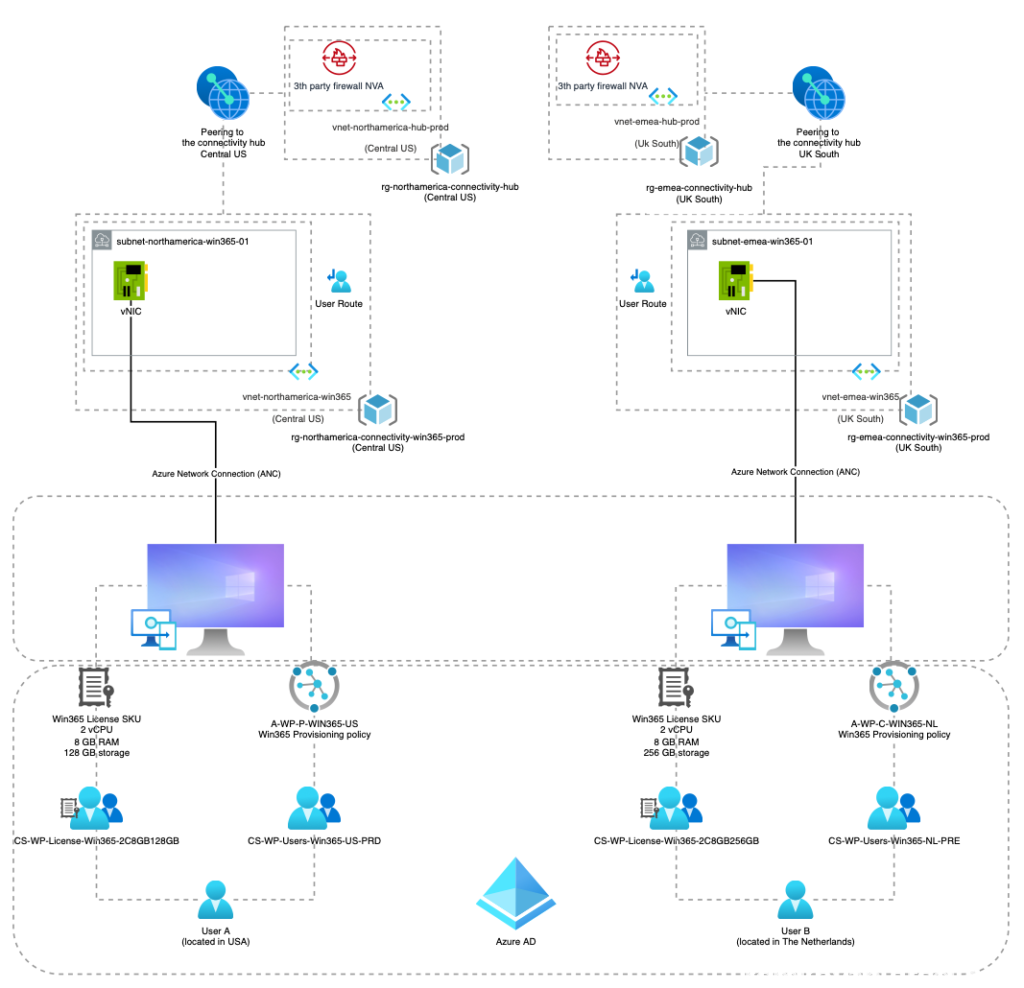
Setup overview diagram

Building blocks
What we need to create and combine are the following ingredients:
- Procure the Windows 365 Enterprise licenses
- Licensing Groups for the different Windows 365 SKU Licenses
- User Provisioning Groups to assign the correct Provisioning Policy
- Device Dynamic Groups for the new Windows365 CloudPC devices (to include in the country global device group)
- Azure resource groups, vNets, subnets, peerings and user routes to the connectivity hubs
- Azure Network Connections (ANC) from the Windows365 PaaS to our WAN (Azure connectivity hubs)
- Win365 Provisioning policies for each country (to provide the user with the correct language and ANC)
Procure Windows 365 Enterprise licenses
Via Microsoft or your licensing partner buy the correct SKU’s and amount of licenses (see below for the setup)
Groups
Licensing groups
Create the following groups for the licenses.
Placing a user in this group will provision the correct Win365 SKU (VM size) to that user.
| License – SKU (CPU/RAM/DISK) | AAD Group |
| Windows 365 License – 2vCPU | 4GB | 128GB | CS-WP-License-Win365-2C4GB128GB |
| Windows 365 License – 2vCPU | 4GB | 256GB | CS-WP-License-Win365-2C4GB256GB |
| Windows 365 License – 2vCPU | 8GB | 128GB | CS-WP-License-Win365-2C8GB128GB |
| Windows 365 License – 2vCPU | 8GB | 256GB | CS-WP-License-Win365-2C8GB256GB |
Per group assign the correct matching SKU

User Provisioning groups
Create the following groups to provide the correct provisioning policy to the user.
In my environment I have a logical separation between pre-production (acceptance) and production devices
| Country | AAD Group | Provisioning policy |
|---|---|---|
| NL | CS-WP-Users-Win365-NL-PRE | A-WP-C-WIN365-NL |
| CS-WP-Users-Win365-NL-PRD | A-WP-P-WIN365-NL | |
| US | CS-WP-Users-Win365-US-PRE | A-WP-C-WIN365-US |
| CS-WP-Users-Win365-US-PRD | A-WP-P-WIN365-US | |
| etc, etc, etc | CS-WP-Users-Win365-{CC}-PRE | A-WP-C-WIN365-{CC} |
| CS-WP-Users-Win365-{CC}-PRD | A-WP-P-WIN365-{CC} |
Windows 365 Device groups
In our environment I already have a full working Intune Modern Workplace setup.
We need to integrate this new device type (CloudPC) next to laptops and desktop.
In order to do this, we need to create the following groups
| Country | AAD Group |
|---|---|
| NL | CS-WP-Devices-Win365-NL-{PRE || PRD}} |
| GB | CS-WP-Devices-Win365-GB-{PRE || PRD}} |
| US | CS-WP-Devices-Win365-US-{PRE || PRD}} |
| IN | CS-WP-Devices-Win365-IN-{PRE || PRD}} |
| etc, etc, etc | CS-WP-Devices-Win365-{ISO_3166-1_alpha-2}-{PRE || PRD}} |
Device groups membership structure for Windows 365

The last two specific Win365 groups are dynamic groups based on a dynamic membership rule. This way the specific Win365 CloudPC’s are automatically added as membership.
| Group | Dynamic membership rule |
|---|---|
| CS-WP-Devices-Win365-NL-PRE | (device.enrollmentProfileName -eq “A-WP-C-Win365-NL”) and (device.deviceModel -contains “Cloud PC“) |
| CS-WP-Devices-Win365-NL | (device.enrollmentProfileName -eq “A-WP-P-Win365-NL“ and (device.deviceModel -contains “Cloud PC“) |
| CS-WP-Devices-Win365-{CC}-PRE | (device.enrollmentProfileName -eq “A-WP-C-Win365-{CC}“) and (device.deviceModel -contains “Cloud PC“) |
| CS-WP-Devices-Win365-{CC} | (device.enrollmentProfileName -eq “A-WP-P-Win365-{CC}“) and (device.deviceModel -contains “Cloud PC“) |
Create all the groups per country you are catering for.
After these, create the following two dynamic groups to “catch all” the PRE-production and production CloudPC devices
| Group | Dynamic membership rule |
|---|---|
| CS-WP-Devices-Win365-ALL-PRE | (device.enrollmentProfileName -startsWith “A-WP-C-Win365-“) and (device.deviceModel -contains “Cloud PC”) |
| CS-WP-Devices-Win365-ALL-PRD | (device.enrollmentProfileName -startsWith “A-WP-P-Win365-“) and (device.deviceModel -contains “Cloud PC”) |
Azure resource
Since we are not going to use VPN clients on the Windows365 CloudPC, but we do want the CloudPC to be connected to our corporate WAN, we need to setup the Azure resource to be able to create the Azure Connectivity Networks required for the the Windows 365 Provisioning Policies.
We already have the Connectivity Hubs in place (based on the hub-and-spoke network topology of the Microsoft Azure Cloud Adoption Framework)
Resource groups
Create the following resource groups:
- rg-apac-connectivity-win365-prod (Central India)
- rg-emea-connectivity-win365-prod (UK South)
- rg-northamerica-connectivity-win365-prod (Central US)
vNet’s
Create the following vNet’s:
- vnet-apac-win365 (Central India)
- vnet-emea-win365 (UK South)
- vnet-northamerica-win365 (Central US)
Subnets
Create the following subnets under their respective vNet’s:
- subnet-apac-win365-01 (Central India)
- subnet-emea-win365-01 (UK South)
- subnet-northamerica-win365-01 (Central US)
Peerings
Create the following peerings under their respective spoke vNet’s to the vNet’s of the respective connectivity hubs:
- peering-apac-win365-to-connectivity-hub
- peering-apac-connectivity-to-win365-hub
- peering-emea-win365-to-connectivity-hub
- peering-emea-connectivity-to-win365-hub
- peering-northamerica-win365-to-connectivity-hub
- peering-northamerica-connectivity-to-win365-hub
User Routes
Create the following user routes and link them to their respective subnets:
- rt-apac-win365 (Central India) linked to subnet-apac-win365-01 (Central India)
- rt-emea-win365 (UK South) linked to subnet-emea-win365-01 (UK South)
- rt-emea-win365 (Central US) linked to subnet-northamerica-win365-01 (Central US)
Example:

Azure Network Connections (ANC)
Create the 3 required Azure network connections to the 3 connectivity hubs to connect to the corporate WAN
| Azure Network Connection Name | Subnet |
|---|---|
| Win365-AAJC-APACs | subnet-apac-win365-01 |
| Win365-AAJC-EMEA | subnet-emea-win365-01 |
| Win365-AAJC-NORTHAMERICA | subnet-northamerica-win365-01 |
Example for EMEA:

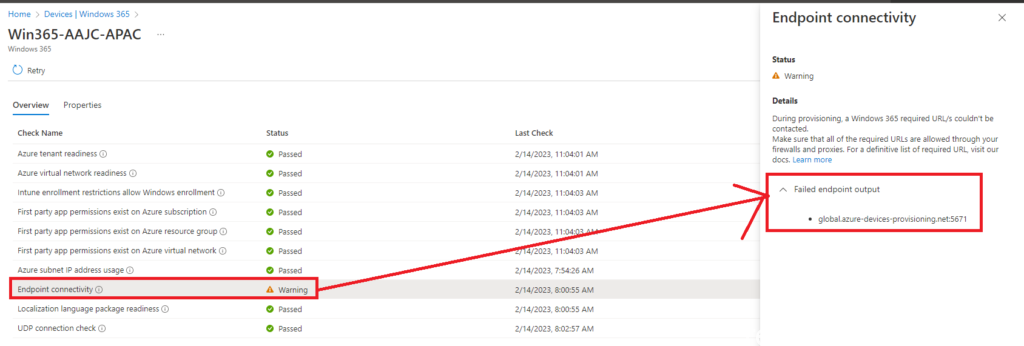
Make sure all the connection pass the status check successfully:

If you have any error, check if the ports and hosts are not being blocked by your firewall:
https://learn.microsoft.com/en-us/windows-365/enterprise/health-checks#supported-checks
An error would show up like this for example:

User settings
Edit the User Settings (we just need a default one)
In the User Settings you can define if users are going to become a local administrator (nope!) , we allow them to restore their CloudPC to a earlier point in time which we set the interval to 12 hours (go maximum get 10 restore points)
Link it to the 4 Licensing groups

Provisioning policy
Create the provisioning policy per country and per environment (PRE-PROD and PROD)
Example the pre-production Dutch (NL) provisioning policy


Test if everything works first, after this change the Microsoft Hosted Network to your own Azure network Connection and re-provision the CloudPC.

Testing
Add a test user to the following groups:
- Licensing SKU group (eg: CS-WP-License-Win365-2C8GB256GB)
- User Provisioning Group (eg: CS-WP-Users-Win365-NL-PRE)
You will now notice under All Cloud PCs that the new CloudPC for NL pre-production is being provisioned with the SKU VM size specs set to 2 vCPU, 8GB memory and 226 GB storage disk space

In the meanwhile, the user will see this when logging in to https://windows365.microsoft.com/

Once everything is provisioned successfully the user will see this:

Open in Browser

Grace period
When a license is removed, the CloudPC will be in grace period

The user will see this notice:

You can force the deleting by clicking on the in grace period and forcefully delete it


The CloudPC will now be deleted (de-provisioned):

Re-provisioning
Click on the CloudPC name which will re-direct you to the device on the Intune portal.
There is a button to re-provision this CloudPC:

Additional configuration profiles
For additional configuration profiles I have created the following:
Do not skip the user part of the ESP page, but creating this Custom ORA-URI setting (assign it to Win365 devices ALL group only):
OMA-URI Settings
Name : SkipUserStatusPage
Description : Do not skip UserStatusPage ESP
OMA-URI: ./Device/Vendor/MSFT/DMClient/Provider/MS DM Server/FirstSyncStatus/SkipUserStatusPage
Data type: Boolean
Value: False
Also I created a second policy to block all copy/paste actions from and to the CloudPC and disabled printing:
Configuration settings

Administrative Templates
Windows Components > Remote Desktop Services > Remote Desktop Session Host > Printer Redirection
Do not allow client printer redirection
Enabled
Do not set default client printer to be default printer in a session
Enabled
Use Remote Desktop Easy Print printer driver first
Enabled

Windows Components > Remote Desktop Services > Remote Desktop Session Host > Device and Resource Redirection
Allow audio and video playback redirection
Enabled
Allow audio recording redirection
Disabled
Allow time zone redirection
Enabled
Do not allow Clipboard redirection
Enabled
Do not allow COM port redirection
Enabled
Do not allow drive redirection
Enabled
Do not allow LPT port redirection
Enabled
Do not allow supported Plug and Play device redirection
Enabled
Do not allow video capture redirection
Enabled

Windows Components > Remote Desktop Services > Remote Desktop Connection Client > RemoteFX USB Device Redirection
Allow RDP redirection of other supported RemoteFX USB devices from this computer
Disabled